Stable Diffusion basic operation tips!
Stable Diffusion basic operation tips! Explanation of how to see the screen and terminology!
The operation screen and terminology of Stable Diffusion are unique. I have never used other image generation AI, and I wondered, "Where should I operate on the screen...? What is Prompt? There are many people who are confused.
.jpg) |
| Stable Diffusion basic operation tips! |
In this article, I will explain these, so if you read to the end, you will understand how to generate illustrations using
If you are a beginner or have any questions about Stable Diffusion, please read the following articles. It explains in detail how to download and use Stable Diffusion.
How to read the Stable Diffusion operation screen and explanation of terminology
First of all, I will explain "txt2img (generate illustration from text)", which will be used most often.
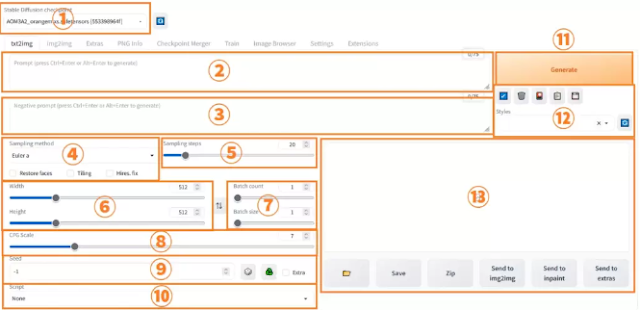
When you start Stable Diffusion, the following operation screen will appear :
- ①Stable diffusion checkpoint
- ②Prompt
- ③Negative prompt
- ④Sampling method
- ⑤Sampling steps
- ⑥Width/Height
- ⑦Batch count・Batch size
- ⑧CFG Scale
- ⑨Seed
- ⑩Script
- ⑪Generate
- ⑫5 Icons・Styles
- (13) Display space for illustrations ・6 buttons
I will divide the screen into 13 like this and explain in order.
①Stable diffusion checkpoint
top left of the screen. The selected checkpoint type is displayed. A checkpoint is "trained data = model" .The characteristics of the generated illustration change greatly depending on what kind of image the model is trained on.
For example... if the model is trained mainly on erotic images, the generated images will also be strong in the erotic direction.
The extension of model data was originally .ckpt (abbreviation for checkpoint), but recently .safetensors, which has excellent security, is the mainstream.
The item name may eventually become "Stable Diffusion safetensors".
②Prompt
 |
| Prompt |
This is the most important element on this screen. Prompt/Negative prompts (described later) are also collectively called "spells", and instruct Stable Diffusion on the characteristics of the illustration you want to generate.
Let's try it. Enter "a cat" in the prompt item and press "Generate" on the right.
An ai illustration of a cat should have been generated (regardless of quality). This is the most basic way to use Stable Diffusion.
If you don't like the illustration, press the Generate button again and it will generate a new one as many times as you like. In fact, many illustrations of cats with strange body shapes must have been generated.
Keep in mind that in order to find a good illustration, it is necessary to repeat the generation while adjusting the prompt.
Note that the prompt does not necessarily have to be a word. A phrase like 'cat sleeping on the desk' is fine.
Try different Prompts to see how far you can communicate with Stable Diffusion.
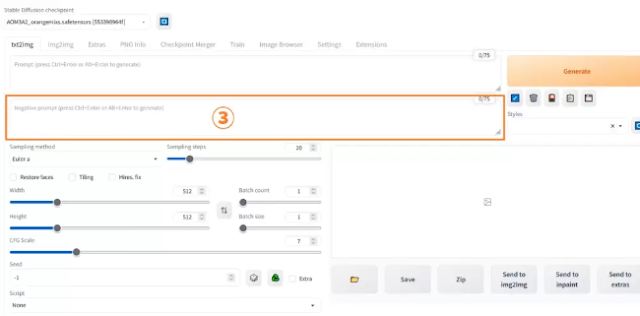
③Negative prompt
Contrary to Prompt, it is an item that instructs StableDiffusion "features that you do not want to generate".
For example, let's consider the case of making an "illustration of a cat without a tail". It is a Negative prompt that plays an active part in such a case :
- Prompt: a cat (generate a cat illustration)
- Negative prompt: tail (Don't draw the tail)
By sending these instructions to Stable Diffusion, an illustration of a cat without a tail is generated (although it's not 100% perfect...). For the time being, I would appreciate it if you could understand at least the concept of a Negative prompt here.
④Sampling method
 |
| Stable Diffusion illustration |
Algorithm for generating illustrations, which affects the design and generation speed of generated illustrations. Many sites call it "Sampler", but they are the same thing.
Some models recommend specific sampling methods. In that case, do not hesitate to choose the recommended one.
Unless otherwise specified, DDIM is recommended. It generates high-quality illustrations with a small number of steps.
If you want to know more about the sampling method, please read the following article as well.
 |
| Stable Diffusion Sampling method |
Also, under Sampling steps, there are three checkboxes: Restore faces, Tiling, and Hires. fix. This is an element that corrects the illustrations that are generated. Let's look at them in order.
Restore faces :
It corrects "to make the face symmetrical", but it is an old function and not very popular. If you are a beginner, you don't have to touch it for the time being.
Especially when outputting anime-style illustrations, the quality of the illustration will be lowered, so be sure to uncheck it.
Tiling :
A function that spreads the contents of the prompt over the entire illustration. To be honest, I've never used it.
When I generated it with "a cat" as a trial, it looked like this. When do you use it?
Hires. fix
Using Hires. fix, the process of "generating high-quality illustrations"
- STEP1: Generate an illustration in standard size
- STEP2: Enlarge the illustration (at this time the image quality becomes rough).
- STEP3: Clean the rough enlarged illustration with img2img.
It is a function that can be divided into these three.
The reason why I bother to divide it into three is that the model is not good at generating high-quality illustrations. This is because many models are trained on 512x512 size images.
Therefore, if you try to generate a high-quality illustration suddenly, there is a high possibility that it will not go well. The structure tends to fall apart.
That's where Hires.fix comes in. The merit is that the composition is difficult to collapse because the illustration is made in a standard size at the beginning.
After that, the image is enlarged (while maintaining the composition) and then the image quality is increased, so you can obtain a high-quality illustration while respecting the original composition.
Let's increase the resolution using Hires.fix to generate decent high-quality illustrations.
Details on how Hires.fix works and how to use it are explained in the following article.
>> [Stable Diffusion] How to increase resolution and improve image quality with Hires.fix
⑤Sampling steps
Roughly speaking, it is a numerical value that represents "how many times to remove noise".
Only very low-quality illustrations like this are generated.
On the other hand, if you carefully remove the noise over 40 times :
You can create beautiful illustrations.
“In the end, how many should we set? ], but this is roughly divided into two depending on the type of sampling method used.
If you are not sure, set the sampling method to DDIM and set it around 15 to 20 steps.
If you want to know more about the sampling steps, please read the following articles as well.
⑥Width/Height :
Represents the size of the generated illustration. The initial setting is 512×512. This is the size most models are most comfortable with.
Larger sizes use more VRAM and take longer to generate. First, let's generate numbers around 512 x 512.
⑦Batch count・Batch size :
The batch count is the number of times to generate an illustration with the entered conditions. If the Batch count is 1, generate 1 illustration and finish. If it is 2, the process is repeated twice to generate two illustrations.
On the other hand, Batch size is the number of illustrations to be generated at the same time. If the Batch size is 2, the image generates 2 illustrations in parallel.
For example, if the Batch count: is 3 and the Batch size: is 5, 15 illustrations will be generated (because the task of "draw 5 in parallel" will be repeated 3 times).
For example, if you want to generate 3 illustrations :
- Batch count: 3, Batch size: 1
- Batch count: 1, Batch size: 3
Two patterns are possible.
The faster generation speed is basically the latter (when the Batch size number is large). If you have enough VRAM capacity for parallel processing, use Batch size for parallel processing to increase the number of generated images.
On the other hand, if the amount of VRAM is small, an error will occur because parallel processing cannot be supported.
Adjust the numbers while consulting with the specs of your computer (especially Gravo).
⑧CFG Scale
 |
| CFG Scale |
A number that indicates how much the entered prompt should be followed. The higher the number, the more Prompt will be adhered to.
How good is case-by-case? Generally, less than 10 is used.
Some models specify the desired CFG Scale value, so first check the download page for the model you are using.
⑨Seed :
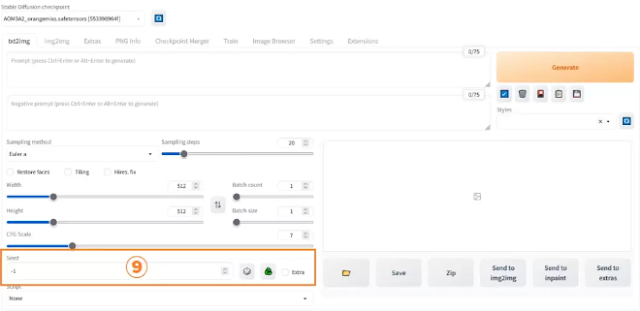 |
| stable diffusion seed |
A number is randomly assigned to each generated illustration.
Conversely, by specifying the Seed value, you can generate any number of the same illustrations.
By changing the conditions such as the model while fixing the Seed value, it becomes easier to verify the difference in the pattern.
Even if you want to compare the difference between model A and model B, if you generate it normally, it will be a different pattern. This is hard to understand, isn't it?
Seed value is active when outputting illustrations with the same pattern so that it is easy to compare.
Note that "-1" entered in the initial state is random, not a specific illustration.
The dice icon on the right restores the seed value to the initial state (-1), and the recycle icon recalls the previous seed value. Let's use it when working with a specified Seed value.
⑩Script
 |
| Script |
Basically, it is OK to leave it as "None". Use only for special purposes such as creating comparison images.
If you want to make a comparison image (matrix table) like this, please touch it. Detailed usage is explained in the following article.
>> [Stable Diffusion] How to use "XYZ plot" to easily compare differences in parameters
⑪Generate
A button to start generating illustrations.
During generation, the buttons change to "Interrupt" and "Skip", so use them when you want to interrupt or skip.
Right-click on the Generate button :
- Generate forever.
- Cancel generate forever.
Two items are displayed.
Select Generate Forever and Stable Diffusion will continue to generate illustrations. Recommended for when you are away.
If you change the Prompt in the middle, it will be reflected from the next generation, which is very convenient. You can improve the conditions without stopping generations one by one.
⑫Five icons
Below the Generate button are these five icons. I will explain each one.
Far left: Arrow icon
This is for calling the prompt we used last time.
Even if you quit Stable Diffusion, the data is retained, so pressing it immediately after startup will display the Prompt before quitting, which is convenient.
However, if you frequently save it as a Style (described later), you may not use this icon much.
Second from left: Trash icon
This is an icon that erases the contents of the Prompt/Negative Prompt column. Let's press it when the existing prompt is no longer needed, such as "I copied and pasted a set of prompts from another site."
Third from left: Hanafuda icon
The most important icon. It is very convenient because files such as Textual Inversion, model, LoRA, etc. are displayed in a list when pressed.
Specifically, clicking LoRA will automatically write the corresponding trigger word as Prompt. Those who frequently switch LoRA will be indebted frequently.
“LoRA? If you're wondering what's going on here, please skip it.
Fourth from left: clipboard icon
Applies the selected Styles (explained in the next section) to the Prompt field. It's like a decision button
Fifth from left: Floppy disk icon
This button saves the currently written Prompt/Negative Prompt as "Styles".
Unlike the arrow icon that can only call the previous Prompt, once saved Styles can be called at any time from the pull-down below. If you write a Prompt that you like, it is recommended to save it.
To apply Styles, select Style from the pull-down menu and press the clipboard icon. It will be reflected in the Prompt and Negative Prompt columns.
(13) Display space for illustrations ・6 buttons :
 |
| stable-diffusion-webui |
There is no need to explain the display space for checking the illustration.
There are 6 buttons under it, but this is for managing the displayed illustration.
When you press the button with the folder icon on the far left,
- stable-diffusion-webui / outputs / txt2img-images / date
folder will open. This is the folder where all generated illustrations are saved.
When generating a large number of illustrations, the inside of this save folder is amazing. "Where's that illustration? Even if you try to look for it, it is very difficult to find it.
The "Save" and "Zip" buttons solve that problem. The illustration (or zip file) saved here is
- stable-diffusion-webui/log/images
saved in a separate folder. This makes it easy to find your favorite illustrations later.
The three buttons on the right are omitted because they are too long.
Let's also use img2img to generate images from images :
Stable Diffusion also has an "img2img (generates an illustration from an image)" mode in addition to the "txt2img (generates an illustration from text)" mode that has been explained so far.
With img2img, you can give instructions with the original image + spell (prompt), so the advantage is that it is easier to convey your image to Stable Diffusion more accurately.
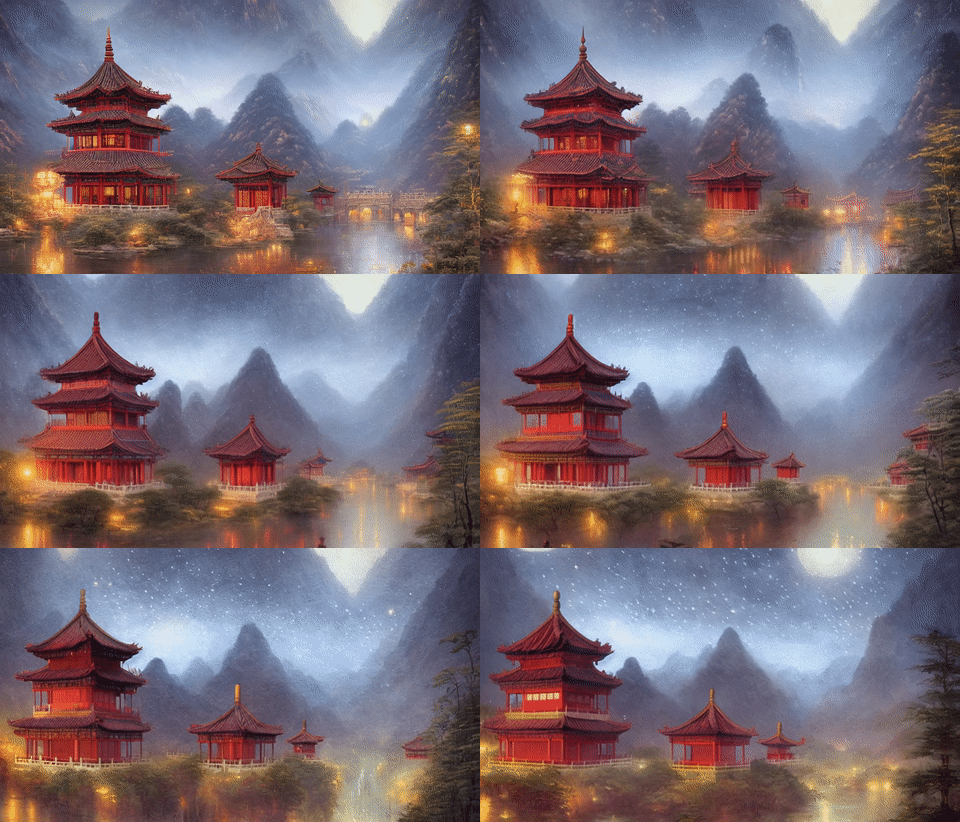
If you get used to txt2img, please try using img 2 img as well. Details on how to use img2img are explained in the following article.





.jpg)
![[Stable Diffusion] Verify the difference between 4 Resize modes that can be selected with img2img!](https://blogger.googleusercontent.com/img/b/R29vZ2xl/AVvXsEiSgw-GWbuTw8fPi0JnvozLQ2Ixlsg_goCLY72PS2th4uzjl6A0lDd0renhzPlnCTPcCLPsYWswSu5PYV3wAMvb6gHBLVcPsK33jhzIVXAuQ0Md7idY1HtGWdXGN5umxC2lPZseDBPqGfASAY0FE5qh7FdrABSid2wsI7XvaKL2A0vbGWpK5gXklIDc/w640-h360/Modern%20Promotion%20Business%20Agency%20Blog%20Banner%20(12).jpg)
.jpg)