How to download and install Stable Diffusion Web UI
Stable Diffusion can also be used on the browser, but there are various restrictions such as the number of uses. It's best to download it to your own computer if you want to use it.
.jpg) |
| How to download and install Stable Diffusion Web UI |
In this article, I will explain How to download and install Stable Diffusion Web UI, so if you read to the end, you will understand how to download Stable Diffusion to your machine and generate illustrations freely.
How to use Stable Diffusion is explained in detail in the following article. Read on if you have any questions about Stable Diffusion.
>> [Complete Beginner's Guide] Thorough explanation of how to use Stable Diffusion!
What are the features of Stable Diffusion web UI?
"Stable Diffusion Web UI" is a user interface that can be used on a web browser. Roughly speaking, it is a tool that makes Stable Diffusion easier to use.
Originally, in order to run Stable Diffusion, it is necessary to type in program code in a language called Python, but... it's impossible, isn't it? At least I can't.
Web UI was developed so that even such people can easily operate Stable Diffusion. Most people using Stable Diffusion in their local environment have installed it. Of course, it's free, so let's use it.
The web UI developed by a person called "AUTOMATIC1111" boasts an overwhelming share and development speed, so this is the only choice at present. This article also explains how to introduce this Web UI.
Preparation before introducing Stable Diffusion Web UI
 |
| Preparation before introducing Stable Diffusion Web UI |
In order to use Stable Diffusion comfortably in a local environment, a computer with appropriate specifications is required.
The graphics card is especially important. If the graphics board is poor, problems such as "error due to lack of VRAM" and "illustration will not be generated forever" will occur.
Even if you go to great lengths to introduce Stable Diffusion, it will be a waste of money.
Specifically, I would like to prepare a PC equipped with an RTX3060 or higher grabber.
[3 STEP] How to download and install Stable Diffusion Web UI
Follow the 3 steps below to download and install Stable Diffusion in your local environment.
- STEP1: Download Python
- STEP2: Download Git
- STEP3: Download Web UI (AUTOMATIC1111)
I will explain in order.
STEP1: Download Python
Stable Diffusion is originally a tool that runs in Python. It doesn't start without it.
We don't need to enter complicated program code, but when Web UI executes Stable Diffusion, we need a "Python installed environment".
 |
| STEP1: Download Python |
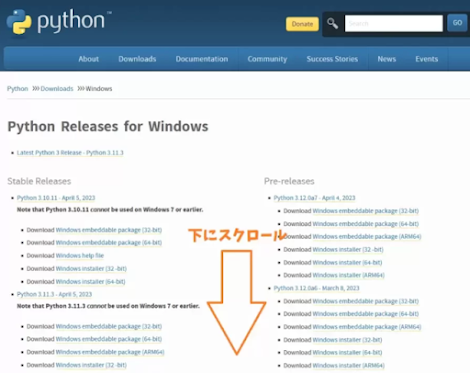
If you go to this official Python site and scroll down the screen :
 |
| Python installed environment |
Please download this because there is an item of "Python 3.10.6" .
There is also a newer version of Python but on the official website of Web UI, which will be downloaded later.
 |
| AUTOMATIC1111 |
Source: AUTOMATIC1111
"Python 3.10.6" is specified. Doesn't seem to support newer Python versions yet.
The supported Python version may change due to future Web UI updates, so please check the AUTOMATIC1111 page once.
After the download is complete, open "python-3.10.6-amd64" and install Python on your computer.
At this time, check "Add Python 3.10 to PATH" . If you forget to turn it on, the web UI that will be introduced later will not recognize Python. It is troublesome to set the PATH again.
STEP2: Download Git
Next, download Git.
According to Wikipedia
Git is a distributed version control system for recording and tracking the change history of program source code. It was developed by Linus Torvalds for use in Linux kernel source code management and has since been adopted by many other projects.
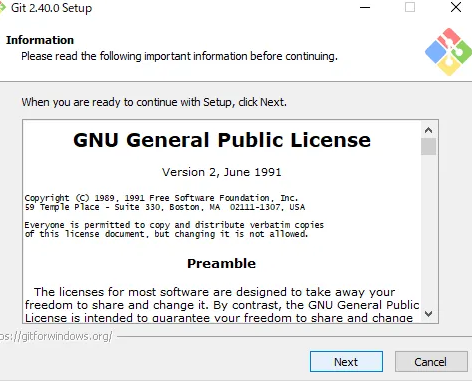
Right-click in the folder where you want to download the Web UI → Click "Git Bash Here".
* Since various models (@ large capacity) will be put into this folder in the future, it is recommended to select a folder with enough free space.
Once Git is open
- git clone https://github.com/AUTOMATIC1111/stable-diffusion-webui.git
Please copy and paste this. Then the web UI will be downloaded automatically. I think Ctrl+V doesn't work, so let's paste with right-click → Paste.
If you press the Enter key in this state, the download will be completed immediately, so please take a look at the folder you specified earlier.
A new folder called stable-diffusion-webui has been created. Steps 1 to 3 are now complete. Thank you for your hard work.
Start Stable Diffusion
Open the created "stable-diffusion-webui" and click the second "webui-user (Windows batch file)" from the bottom.
A command prompt will open and some obscure code will be executed, so let's wait for a while.
Roughly speaking, when you start for the first time, various files are downloaded. Please be assured that it will wake up quickly from the next time onwards.
It will take several minutes to complete, so feel free to take a break or do something else.
When the screen stops moving, the 4th line from the bottom
- http://127.0.0.1:7860
and open it in your browser (such as Chrome).
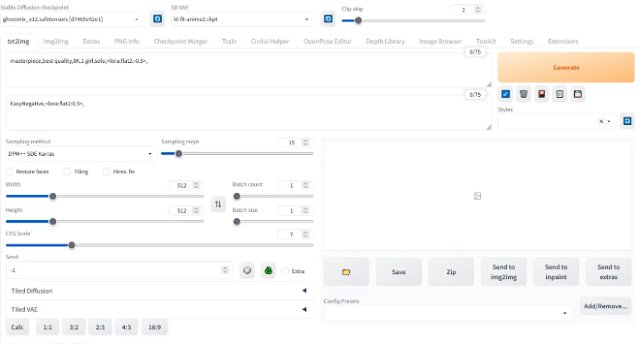
It is OK if this screen appears. You are now ready to generate AI illustrations.
Enter the English word you want to output in the "Prompt" field on the upper left, and press "Generate" on the right to generate the image.
For example, if you type "mountain"
This image is the output.
To be frank, I think that there is a "feeling that it is not this" (especially for illustrations of people), but for the time being, the first step of AI illustration generation is completed.
In order to improve the quality of the illustration, it is necessary to introduce a model and tweak various settings, but the details are explained in the following article.


.jpg)
![[Stable Diffusion] Verify the difference between 4 Resize modes that can be selected with img2img!](https://blogger.googleusercontent.com/img/b/R29vZ2xl/AVvXsEiSgw-GWbuTw8fPi0JnvozLQ2Ixlsg_goCLY72PS2th4uzjl6A0lDd0renhzPlnCTPcCLPsYWswSu5PYV3wAMvb6gHBLVcPsK33jhzIVXAuQ0Md7idY1HtGWdXGN5umxC2lPZseDBPqGfASAY0FE5qh7FdrABSid2wsI7XvaKL2A0vbGWpK5gXklIDc/w640-h360/Modern%20Promotion%20Business%20Agency%20Blog%20Banner%20(12).jpg)

.jpg)